Wednesday, October 26, 2022

The Beginning


Full Coverage Cross Stitch

My Full Coverage Cross Stitch Story 

Many many years ago in the late 1990's I tried to cross stitch.  It did not go well.  I was in college and really, really wanted to enjoy this craft.  I tried multiple smaller projects only to be frustrated with mistake after mistake.  Projects would be picked up and then put down for months or years.  I finally managed to get a couple of projects done, but decided that cross stitch was just not for me. 

Over the years, I would see cross stitch projects and want to pick them up but wouldn't do it.  Nope cross stitch is just not for me.  During this time I did pick up a small needle point project that I loved. I loved the full coverage of needle point and how much easier I found the craft.  But the price of needle point was beyond what I could afford. 

Then this year in July I stumbled upon a floss tuber that opened my eyes to a whole new world of HAED. I had been avoiding floss tube as I was not a cross stitcher but Teresa Little Stitcher had a video on how she stored her floss.  I was intrigued by this because over the last year to year and half I had been doing hand embroidery and had my own stash of floss.   The video was very interesting and opened up questions about her cross stitch journey, so I decided to watch all of her videos.  She introduced me to full coverage cross stitch.  

I had never heard of this before but loved what I was seeing on her videos.  She introduced me to the Heaven and Earth Designs (HAED) company that has beautiful full coverage cross stitch.  She showed a design that I just had to stitch.  I jumped in and have not looked back. 

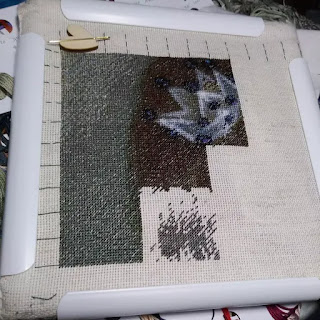
The picture above shows my first 100 stitches on the Faces of Faery 201 design that I am currently working on.  I love full coverage.  I find it easier to stich than normal cross stitch because every box is getting covered with floss. Yet I understood that HAED take years to finish, not weeks or months.  This was fine with me because I loved the design, so much I could put in the time.  I loved stitching on it so much I kept watching more and more floss tube.  I found new designs that I wanted to stitch but they were not full coverage.  

Then inspiration struck that all I had to do on a chart that is not full coverage is pick a color for those empty blocks.  I picked up a Primrose Cottage design for Halloween that was almost full coverage already.  I started stitching it along with my HAED. Here is is: 

Finished Boo Bash Primrose Cottage Design


I love full coverage! I love how it looks and feels.  I love how much easier it is for me to stitch.  I still have made some mistakes, but it doesn't frustrate me the same way it had before.  I love that cross stitch is very portable projects that can be brought where ever you need it to be and have time to stitch. This is just the beginning for me.  I hope you will like to come along with me on this new crafting journey.  Here is where I am currently on my HAED project: 

Current progress on full coverage cross stitch


Happy stitching!


Sunday, May 17, 2020

2020 Crafty Goal Update


Seaglass 6x6 Pad

2020 has been a difficult year. I have not been able to do the amount of crafting I had hoped to get done this year. I was able to use one whole 6x6 paper pad by Recollections called Seaglass.  Below is my project share video. 


I was able to make 4 3x5 Journals and 30 Greeting cards from the pad.  Before I started making my projects, I looked at the images in the paper to find inspiration for some die cuts. I cut out two different types of flowers, leaves, base of a pocket watch, a scallop circle, and sentiments.  The flowers and leaves where cut from both Grey and White Recollections cardstock and Mint Macroon and Mossy Meadow from Stampin' Up with my Cricut Maker.  The Mint Macroon matched very well with the colors in the paper pad.  I used glitter and white vinyl for the scallop circle and the sentiments.  I found all of the images with my Cricut Access membership. 

I hope you found some inspiration and are able to do some crafting this year. Don't give up on those crafty goals!

Wednesday, January 8, 2020

2020 Crafty Goals


Why Set Crafty Goals

It is a brand New Year. Time to think about what I want to accomplish before 2021.  I looked at all of my personal goals and decided to separate them by category.  What are my learning goals, financial goals, career goals, and (most importantly) Crafty Goals!  

Why even set goals? They just cause extra stress, right? 

Goals shouldn't been seen as adding stress to your life, but giving you a way to focus your time and energy more effectively. For me, I want to make sure that I using my crafting time in the most effective way for me. Setting goals allows me to have a way to measure what I have done with my time against what I want to have accomplished during that time. Personally, I like to think about my projects and set goals designed to get those projects done.  You can also set your goals based off how much time a week you want to craft or pick a new technique to learn each month.

You can learn about my crafty goals by watching the video below: 


What are you crafty goals for this year? What would you like to accomplish?

 Let me know in the comments below.

Let's get crafty!

Friday, May 10, 2019

Cricut Design Space


Lace Tulip Card

Spring came with it's lovely inspiring array of colors.  Inspired by all of the beautiful flowers blooming at this time of year, I created a Lace Tulip Design in Cricut Design Space.  I used only the circle shape to make the flower and stem.  This card was created using only two supplies that are listed below this video.

I didn't show in the video, but the Love You sentiment is using font A Perfect Day.  This font is a Cricut supplied font. Whenever I cut out fonts, I like to cut two.  This way if one doesn't release from the mat or contact sheet correctly, you have a spare ready to go.  Both of my fonts did release perfectly, so I made two cards at one time!

Here is the video on how I made the design and put it on my card:


Supplies Used in Greeting Card:

* Neenah 110 lb White Cardstock
* Cricut Adhesive Foil - Gold 

Friday, May 3, 2019

Cricut Design Space


Captain America Logo Card

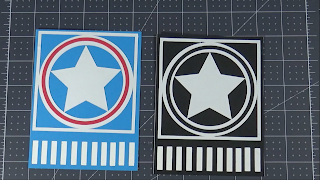
My card today is a Captain America Logo card similar to the Marvel Avenger Logo card from my last post. I had so much fun creating the Avenger's card, I wanted to keep going.

Here is some information about the software I am using to create these logos. The Cricut Design Space software allows you to cut many different images with a Cricut Explore or Maker die cutting machines.  The software is free, but you do have to pay for images created by Cricut or their guest designers. You can upload your own svg images and cut them as well. I wanted to show that you still have a lot of options to create your own images by just using the basic shapes that are free in the software. I was inspired by all of the people doing punch art with circle punches. Once you have created a image in Design Space you can save it under your projects, so that you can make more in the future.

I created two cards today.  One in black and white to match the Avengers card and one in Captain America's traditional red, white and blue colors. The card size is a US standard 4 1/4 x 5 1/2 inches on Neenah 100lb white cardstock card base.  I did create an additional background layer with strips at the bottom.  I layered the background onto the card base with the intention of the white showing through the cut outs at the bottom of the first layer.  I like having the layers to create some depth on the card without creating a lot of bulk to the card. I also used Art Glitter Glue to attach all of the pieces.

Below is the video showing how I created the logo in Cricut Design Space and how I assembled the traditional red, white and blue card. 


Please let me know in the comments below if you like the traditional or black and white version of the cards.

Happy creating!

Friday, April 26, 2019

Create It With: Cricut Design Space


Marvel Avengers Logo Card

The Marvel Avengers Logo card is a US Standard 4 1/4 x 5 1/2 inch card.  The card is black and white with Recollections cardstock. The card based is made with Neenah 100lb cardstock from an 8 1/2 x 11 sheet.  The white Neenah cardstock was cut in half at 5 1/2 x 8 1/2 inches and then scored at 4 1/4 inches.  Art Glitter Glue was used to attach all of the pieces together.  

Cricut Design Space was used to create the logo and cut out the black circle.  The Cricut Maker die cutter machine cut both pieces.  Below is a video showing how the logo was created in Design Space and then assembled. 


Happy Creating!

Monday, January 7, 2019

Cricut Shaker Ornaments


Here is a fun video on how I made some shaker ornaments this holiday season. I cut everything out with my Cricut Maker die cutter.  The ornaments are 4 x 3 1/4 inches.

Here are the items I used:

Woodland Wonder paper pad
Colorbox Red Cardstock
Stampin' Up Diamond Glitter Paper
Stampin' Up Foam Adhesive Strips
Sequins
Glitter
Art Glitter Glue
Recollections Baker Twine